PAPER MAKING: with fabrics

I was pleased with my flower paper made using torn recycled cartridge paper BUT it was challenging to get the consistency in the quality of each sheet, resulting it paper sheets with holes or thin areas, this is a nice tissue paper like quality but the fradgility makes manipulation and binding challenging and is not what I wanted to achieve this may be because I got the ratio of water to pulp wrong and may need to thicken the consistency to make the paper more ridged.

I wanted to experiment with paper and fabric blends, to make a hand made watercolour paper. To make this I shredded pieces of recycled calico cut ofs from the textiles room, then pulped it with a ratio 3:2:1 water, fabric, and paper.

This once pressed dried and rolled became a soft durable paper compared with the fragile flower paper. Almost fabric like in its quality.

As a result of this experiment I want to undertake more paper making continuing with alternative fabrics and materials such as wool and felt to experiment with texture value and explore the best options for book binding at a later stage.

USING THE LETTERPRESS

IMG_2371IMG_2372
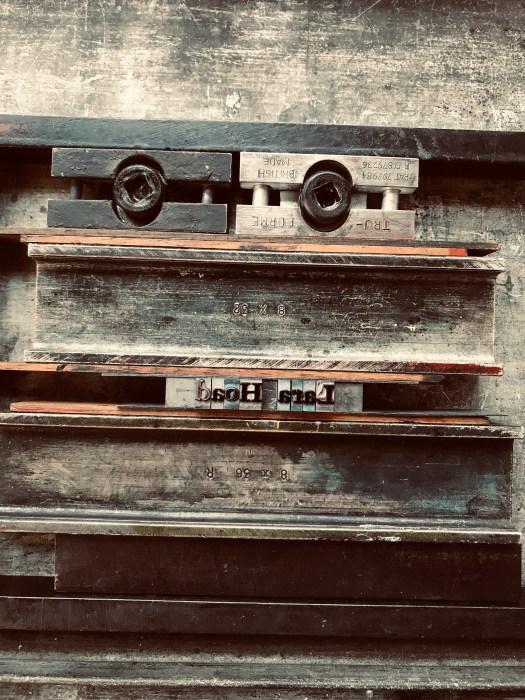
I attended a letterpress workshop to widen my knowledge of the facilities in the print studio and to equip me with the skills to print onto my work if I want to explore this further. There was a wide variety of typefaces available and if I were to do this again I would be more experimental with the type I use.

Letterpress workshop
  • Use frame and metal ruler
  • Make sure lead is longer than the sentence
  • assemble letters on ruler over the lead piece
  • Notches must line up
  • upside down left to right
  • Spaces are shorter than text
  • Piece of Lead on top
  • Pinch the type between the lead
  • Coins go at the top (things of lead with holes in)
  • Fill surrounding gaps with lead and a slice of wood mirror it the other side
  • Tighten the keys evenly
  • Check the type is tightened in the frame
  • Text should be flush- if not tap with a hammer with wood over text
  • If doing more than one line of text use little spacers between the text and the words and lines
  • Printing place gram in machine two notches on frame must line up
  • Ink goes on top plate
  • Use ink in guns with yellow handles
  • Oil based ink – comes off white spirit
  • Remove cap from ink squeeze onto glass roll evenly
  • Roll onto printing plate not loads on plate
  • Leave packing on frame
  • Roll letters with ink pull handle down
  • Lay paper
  • Press handle until tight
  • Don’t use paper that’s too big
  • Ink will be really wet 2-3 days to dry
  • Use white spirit to remove ink. white spirit is in can

Problems I faced: I found this workshop and technique really challenging as you have to visualise the letters back to front and line them correctly. This took me a few attempts as I managed to get bs ds and qs mixed up. I was trying to spell my name. After several attempts I had correctly arranged the letters. If I were to do this again I would print the text back to front as a guide as it would speed up the process.

This is a really interesting technique with very satisfying outcomes. The print is not only aesthetic in itself as a perfect print it has a slight embossed effect on the paper making the type more prominent and significant this could have a really lovely effect on hand made paper.


PAPER MAKING

Using a paper method taught to me in an induction I followed the steps to create paper using torn pieces of recycled cartridge paper and flowers petals and lichen. This is to experiment with combining materials into the paper, I am hoping the petals will bleed slightly to create a watercolour like effect on the paper.

Paper making:
Ripping paper first
Blitz with a almost full jug of water,
Aim to make 8 jugs couple glugs of pva glue,
Lay folded jay cloths on the tray on the wood
Use the frame and submerge in pulp and drain until water Goes
Lay on the stack- push down to release- jay cloths between each layer
Pressing it- 4 washers on bottom 4 washers on top with bolts
Press with 4 washers and nuts
Screw alternate corners leave to drain for half an hour
Once finished sieve pulp in a bucket over the sink
Unscrew and peel layers of cloth off, hang in dark room on cloth

problems I came across: I struggled to maintain a consistency that created uniform sheets, i discovered towards the end of my paper making this was down to the added ingredients such as flowers ect, making the paper harder to release from the frame causing sections to rip and tear. I know this isn’t the best result to have had and I was a little disappointed with the amount of complete sheets I produced. but i am still satisfied with the paper i produced, I like the authenticity of the inconsistency, this may be interesting contents to a book? i’m not striving for perfection but I feel the more I practice the  better the quality of the paper will be.

I want to continue making papers and explore using alternative materials for the paper and more traditional ingredients, this project gives me the perfect opportunity to explore the possibilities of paper making and then binding into books.


CREATE YOUR MARK: project ideas

Continuing on from my field project I have developed an interest for the process and exploration of book making and paper making.

As part of this project I want to explore the uses of the traditional techniques involved in making books by hand including (binding, paper making, letterpress and printing as well as embossing and engraving) as well as introducing and researching modern alternatives and artist books.

As my interest stems from a short 5 week project, Behind the barcode. I was unable to develop my ideas fully within the time frame, having a longer spending project I want to take inspiration from other artists and traditional methods and techniques in both bookbinding and paper making and combine them with modern takes considering eco friendly and sustainable aspects within the design of the books.

I want to use a variety of materials to do this, some natural materials when making the paper such a petals and other plant matter, possibly exploring natural dying. Leather and recycled materials, hard and soft back books as well as surface decoration using sculptural techniques, embossing and engraving.


MEDAL PROCESS: MAKING THE MOULD AND CASTING IN WAX

Using plasticine I fixed my forms to the board reinforcing the edges with plastic and tape to form the area for the silicone mould. after mixing the ingredients, I poured it into the moulds and released as many of the air bubbles I could as this affects the detailed, i let the moulds set overnight.

LESSON LEARNED! use a release agent on the ceramics before covering in silicone, when taking these from the mould the silicone stuck to the forms and I lost a lot of details that I will have to rebuild using wax.

fullsizeoutput_3b0

Using these moulds I then melted green wax and cast the forms. As I made these as two separate forms I then had to melt the two halves together in order to make the medal whole. I am pleased with the overall outcome. I now have to wait until my group is all at the same stage so that we can progress onto the ceramic tree stage of the bronze process.

MOON RESEARCH: MYTHS AND SCIENCE

“On July 16, 1969, astronauts Neil Armstrong, Buzz Aldrin and Michael Collins lifted off from Launch Pad 39A at NASA’s Kennedy Space Centre in Florida on a journey to the Moon and into history. Four days later, while Collins orbited the Moon in the command module, Armstrong and Aldrin landed Apollo 11’s lunar module, Eagle, on the Moon’s Sea of Tranquillity, becoming the first humans to set foot on the lunar surface.”

NASA. (2019). NASA Celebrates 50th Anniversary of Historic Moon Landing. [online] Available at: https://www.nasa.gov/press-release/nasa-celebrates-50th-anniversary-of-historic-moon-landing-with-live-tv-broadcast [Accessed 14 Oct. 2019].

The man in the moon origins:
The man in the moon scars (that is seen on the surface of the moon) were created by asteroids that crashed through the surface of the moon, triggering volcanic bulges. This can be seen by the dark patches on the moon’s surface, which are called “lunar seas”, that most notably forms the moons recognisable face, known as “the man in the moon” (pictured below).

Picture 1.png

En.wikipedia.org. (2019). Man in the Moon. [online] Available at: https://en.wikipedia.org/wiki/Man_in_the_Moon [Accessed 14 Oct. 2019].

Historic Myths of the man in the moon:
Tecciztecatl:
A male Anzac god associated with Asian culture

Picture 2

En.wikipedia.org. (2019). Tēcciztēcatl. [online] Available at: https://en.wikipedia.org/wiki/T%C4%93ccizt%C4%93catl [Accessed 14 Oct. 2019].
Selene/Luna:
A Greek goddess in roman mythology, paired with the god of the sun. She takes care of the moon at night as he takes care of the sun during the day.

Picture 3.png

En.wikipedia.org. (2019). Luna (goddess). [online] Available at: https://en.wikipedia.org/wiki/Luna_(goddess) [Accessed 14 Oct. 2019].

The God of Drunkards:
A medieval belief of a man held in the moon with a taste for claret. The man in the moon is also named within early English nursery rhymes.

BAM’S MEDAL PROJECT: CLAY OUTCOMES

Exploring this brief and the concept of an artistic medal I have chosen to commemorate the 50th year since the moon landings. to celebrate this my concept for my medal is a two sided contrasting piece that recognises the jump in scientific research and development by comparing pre and post landings.

Medal ideas, Inspiration and context:
I wanted to represent the moon by juxtaposing two beliefs of the moon on each side of the medal. For the front of the medal, I will portray the historical understandings of the moon (exploring the moon’s relation in mythology and anthropology). For the reverse side of the medal, I will represent the moon’s surface and crater-filled texture, to artistically signify the advancements in human technologies that have allowed the moon’s surface to be revealed in great detail. The two sides will create a visual contrast between the portrayal of the moon through stories and myths, and the reality of the formation of the moon created by asteroids. This is to explore the relation of the human established beliefs of the moon (pre landings), and the contrasting scientific understandings of the moon (post landings). I am exploring this to celebrate the 50th year anniversary of the moon landings, celebrated in 2019.

TRIP: ROYAL MINT

I have decided to pick the BAMS project for my brief, this trip was particularly useful for me as I have gained knowledge of how the mass production of coins is created but also how the designers create the designs large scale by hand carving the details in order to reproduce on a smaller scale.

it was fascinating seeing the massive scale of the production and the mint condition when first created.

i think it is important for me to consider the reproduction of my medal to insure I get consistency between my mock ups and my final bronze forms.


TRIP: ST FAGANS

I found this trip particularly interesting, being shown the archives and the collections allowed me to think about possibilities and consider traditional techniques within my work that I could use as part of my chosen briefs.

The carving techniques in particular used as traditional love spoons and butter presses inspired me most. wood carving is a technique I would like to pursue with during my time at uni.

At current I feel I am going to pursue the BAMS project but this trip was still of use to me and I enjoyed looking at the collections.

Design a site like this with WordPress.com
Get started